It's the last month of the year already. Can you
believe it?
Crazy!
It's barely snowed! I work with a lady from Texas and she gets really excited every time she hears it's supposed to snow. She wants to have her very first white Christmas. She's cute.
Here are some hats I made just because I wanted to try out a pattern or try to come up with one...
The blue one is a pattern I found on
April Draven's craft blog. It's filed under "plain slouch hat" and I just changed the colors to some yarn I had gotten and wanted to see what pattern it would make. Sometimes you think it will give you one pattern and it doesn't, ya know?
The kitty one is a basic beanie pattern (I believe the pattern was called snowboarder beanie, but I am currently unable to find the pattern to link to it. I hadn't noted where I found it. Sorry.) and found a picture that was kind of pix-elated. I think it was a picture of those beads that you put together to make a picture and then melt them to keep them together... (Just google images and type in "hello kitty and pixels" and you will probably find something similar.) I used it like you would a normal graph and did it with color changes (I think some call it tapestry crochet.) It ended up being kinda big because I waited until after I was done with the increase rows to start the kitty head. It will fit an adult man pretty well. Possibly an adult woman. (It's kinda big on me.)
For the panda hat I used the earflap hat from Micah Makes (I linked it in the last post. I really love that pattern!) And just made some changes of my own. I used the ears from her monkey/bear variation and then some circles for the eyes and embroidered the nose on.
The red scalloped hat I used the same snowboarder beanie pattern and came up with a way to get the bottom edge to scallop. I'll probably be adding eyes or something to it to make it a pacman ghost! (I made a blue one and a pink one last year for my aunt and a friend, respectively.)
The multicolored hat in the middle was made using Peruvian Print Red Heart yarn. I believe I based the design on a pattern I found on
Purple Sage Designz (She has 2 free patterns listed. One was earlier this year, the other a few years ago... closer to when she started that blog.), and then just changed the sides and top a bit.
The red, black and light gray hat was made following the other free pattern on Purple Sage Designz for the zigzag tam. (The one earlier this year.)
The tan and purple hat was based off a picture I found and couldn't find the pattern to. I saved the image and just tried to guess which stitches had been used. The I believe the colors I used were Red Heart's Grape Fizz and Buff. I just alternated every few rows.
On other craftings...
A (sort of) Tutorial!
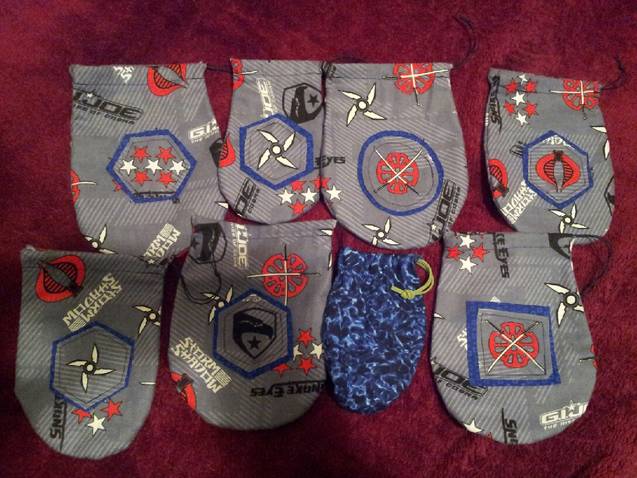
Dice Bags!
My husband and Dad are getting giant bags of dice. I ended up making dice bags for them. Z requested a bag for each type of die so that he could keep them all separate. That means about 7 bags each. 14 in total. (He already had a bag that his friend's wife made so I already had one out of the way!)
Here is what I have done so far:
 |
(Sorry. My shadow kinda photo bombed the picture.)
Also, that little blue bag was made using some material left over from when I made Z some pj pants.
The blue used on the gray bags has little squares on it. |
Hubby picked out some fabric he liked from the remnants bin. There were only 2 that he liked that did not look girly, so we got them.
To make them, all I had to do was lay out the material (and have it folded in half so I could cut both sides at once), trace around my hand far enough away from my hand so that I had a seam allowance and cut it out.
I put the appliques on so they can tell the bags apart better. They will know which bag has what. You can skip this part if you want.
If you do want to put them on, I used some of the left over material and found some of the pictures and cut them out (mostly with a template I made in the shape of a hexagon). I cut out pieces of the blue color we got in pieces just a little bigger than the GI Joe pictures. I sewed them together.
NOTE: You can also use fabric markers to draw on them or you could embroider numbers or even cut out numbers to sew onto the shape. Be creative!
After that I pinned the appliques to one side of the bag and sewed it on.
I then folded the top edge of both sides of the bag over to create a casing for the drawstring.
Now, put the 2 sides of the bag (right sides facing) together and pin. Sew along the edge just below the stitch line for the casing. (See image below.) If you start higher you will not be able to put the drawstring through later. (You will end up with a little bit of a raw edge here, but it's barely noticeable. I just wanted to make it faster.)
Now turn the bag right side out. Get some string or yarn or whatever you want to use for the drawstring (I used some hemp bracelet material I had lying around. It kinda has a coating on it, which seemed to help get it through the casing.) and put it through the casing. It makes it easier to get the drawstring through if you tie one end of it to a safety pin or a paper clip and guide it through that way. Tie both ends of the drawstring together and you are finished!
Any questions?
What have you been doing/crafting lately??
 I have given away 3 of the handmade Christmas gifts so far. I ended up making a few things for my husband's coworker. I was feeling pretty random the other day and made my little brother some little ornaments for the tree my mom got him (a tiny one, being he is off in Cali on his mission). I made him a bacon ornament, a pickle, some ribbon candy and a gingerbread man. The coworker thought the bacon sounded awesome. I ended up making the ones pictured below for him. I even got the honors of one of them hanging in his cubicle! The other is going on his parent's tree (he wants it to be a surprise when she is taking the tree down and finds it... haha). The reason it is "honors" is because not just any old thing will get to be displayed in the coworker's cubicle. He mostly puts up collectibles (like special edition action figures or whatever).
 The other things I gave in a gift exchange I had with my friend and her bf when they came over to hang out. We played the Michael Jackson Experience, Little Big Planet 2, and ate junk food! She made rum cake that was really moist. I just threw some monkey bread we got the other day in the oven.